 Sometimes it can be difficult to get the correct color balance of a photo. It is important to get it right before you begin to post-process your image. The following tutorial will help color correct an image utilizing the white point, black point, and mid-tone gray areas.
Open an image, any image you choose but select one with contrast and color. Contrast is the difference between black and white in an image. High contrast will show the full range of darks to lights and colors while low contrast will not show a lot of difference between darks and lights. Think of a picture of a scene taken in the fog, the difference could be somewhat muted.
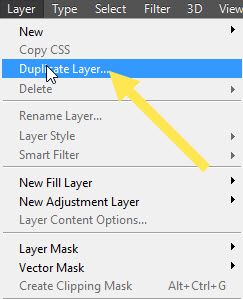
However, this color correction will work on any image but some adjustments will be more predominant or noticeable than others. After you have your image open create a duplicate. Go to Layer > Duplicate Layer. Another way is to Right-click on the Background copy and select Duplicate Layer.

On this duplicate copy, I enlarge the image to 100% and search for any sensor dust spots showing up on the image. This can be done in LR or Bridge's Camera Raw prior to opening in Photoshop. I have noticed sometimes when removing spots through Bridge that it can leave a halo type effect around the spot I removed, that is why I prefer to remove in Photoshop using the "Spot Healing Brush". Don't forget to select the "Content-Aware Option" on the "Option's Bar". You can also use this layer to remove any unsightly objectives, like trash or a lone tree branch in the corner of the image.
Your layers menu should look like the image to the right if you used NIK Define, which as I mentioned, puts its


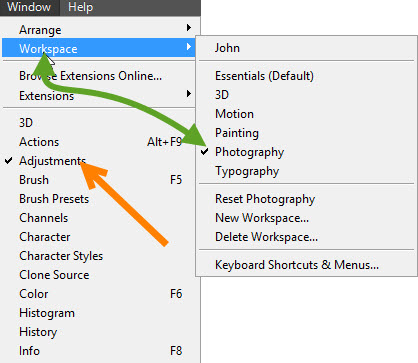
I assume that most people have a workspace area already set up if using Photoshop but if you don’t, go to the "Window’s Drop-down Menu" and under the “Workspace” option select “Photography”. This is a good place to start. You can add to this by opening up other options from the "Window’s Menu" and then save the workspace under your name.
SET THE BLACK ANCHOR POINT
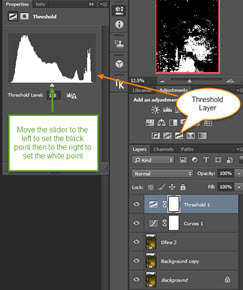 Open up the threshold layer by clicking the “Threshold Icon” in the Adjustments Panel or go to Layers >New Adjustment Layer >Threshold. (This will split the image between black and white). At this point you should have five layers: 1) Background Layer, 2) Background Copy Layer, 3) Noise Reduction Layer, 4) Curve’s Layer, and 5) the Threshold Layer.
Go to the Threshold Histogram and move the slider all the way to the left and then move it back towards the right until the first signs of black appear in the window. (You may need to enlarge the image to see the black area to ensure you get the black anchor point on it.)

SET WHITE ANCHOR POINT
You will need to do the same thing to mark the white point. Move the slider all the way to the right and then slowly move the slider back to the left until the first black area appears. Again using the color eyedropper tool, mark the white spot. This marker should be labeled #2.
Before we go any farther let's address what happens if we click on the wrong spot or we miss the anchor all together? Just try again but remember each time you use the color dropper it labels the new

Now turn off the Threshold layer by clicking on the “Eye” immediately to the left of the layer. Drop down to the curves layer. Zoom into the image so the black and white anchor points are easier to see. When you click on the curves layer a Properties Window will open. Make sure that the "Properties Tab within this window is selected, if it isn't double-click on the Threshold eye-icon nest to the eye-icon to activate it."
In the Curves Layer Window, on the left side, will be three eye droppers, the top one for black, the middle one for mid-tones, and the bottom one for whites. Click on the black eye-dropper to the left of the curves properties window and then click on the black anchor point on your image. Remember this is the first point we created and it was labeled #1. Now click on the white eyedropper in the curves window and then click on the white point, the one labeled #2. We have now set the black point and the white point on the curves layer. Now we need to set the Mid-Tone point.
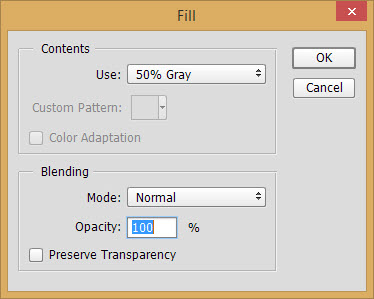 Make sure the Threshold Layer is not active. Now click on the curves layer. Go up to the Layer’s Dropdown menu tab and select new, then layer. When the “New Layer’s Menu” opens, click OK. Now go to the Edit Dropdown menu and select Fill. When the Fill Window opens click on contents and select 50% gray and click on OK. You should have a grayed-out image now showing in Photoshop. Go to the blending mode and select “Difference”. If your screen now looks wild with psychedelic

This will be your third color marker and should be labeled number

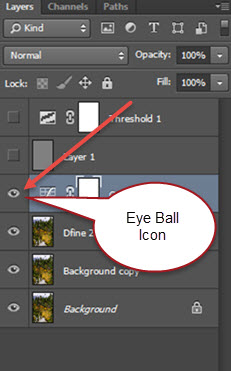 At this point let’s take a look at the before and after effects by holding down the alt key on a PC and clicking on the Eye-Ball icon next to the Background Layer. Continue to hold down the alt key and click again. Toggle this back and forth to see the before and after-effects. If your image looks good you can now delete the Threshold Layer and the 50% Grey Scale Layer. These will only take up space and you don’t need them because any adjustments made by these layers have been applied to your curves layer. If you don’t like the overall effect you can delete the curves layer and start all over.
 Prior to opening in Photoshop I usually adjust for Lens Correction and Remove Color Aberration in the RAW Converter, in my case Bridge but for others Lightroom. I then take the image into Photoshop to run the color adjustment, flatten all layers, and save as a tiff file. I will then reopen in my RAW Converter and begin my post-processing workflow.
Please feel free to share this with others and you might want to print it out for a follow-along reference. I first learned of this technique from Jimmy McIntyre on YouTube.
I learn a lot from watching tutorials and am grateful that there are so many photographers out there willing to share their knowledge and Photoshop skills. Jimmy offers a free set of down-loadable luminosity masks actions and he also sells some great video tutorials.
I am a hard copy kind of guy who believes that training is enhanced if you can see it, then read it, and finally practice it with a reference next to your keyboard. For this reason, I have practiced this technique using my own images and have put it into a written document. If you would like to see Jimmy’s video on this subject just follow this link. Color Correction by Jimmy McIntyre
After performing this action I continued to post-process my image adding contrast, brightness, texture, and some sharpening. Here is a before and after of the image, I used in this tutorial.
BEFORE (RAW File)

AFTER

If you would like a pdf of this tutorial please contact me and request a copy by e-mail at gilbej49@gmail.com.
John Gilbert
www.jmgilbertphoto.com (Photo Travel Journal)
www.jmgilbertphoto.net (Display Gallery)
https://500px.com/gilbej49 (High Resolution Photo Gallery)
https://www.flickr.com/photos/gil-bear/ (Social Gallery)
google.com/+JohnGilbert49 (Social Page for Photography)


