SHARPENING METHODS IN PHOTOSHOP
Software that sharpens an image does so by looking for parts
of an image which has significant changes in color or luminosity and it applies
contrast to pixels on either side of those changes therefore it gives the
appearance of sharpness.
 What is the best
method for sharpening? The one that YOU
are the most comfortable with. The
purpose of this article is to take a look at the various methods offered by
Photoshop.
What is the best
method for sharpening? The one that YOU
are the most comfortable with. The
purpose of this article is to take a look at the various methods offered by
Photoshop.The methods offered by Photoshop are Sharpen, Sharpen Edges, Sharpen More, Smart Sharpen, Unsharp Mask, and High Pass. (Fig. 1-1) The first three are blunt in their techniques and should be used with caution.
In this article we are going to look at “Smart Sharpen”, “Unsharp
Mask”, and “High Pass”. There are other
methods also and there are presets that can help as well, such as the NIK
Collection, Topaz Labs, TKActions by Tony Kuyper and I am sure many more.
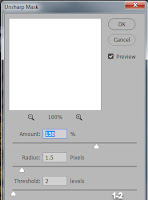
 UNSHARP MASK: This filter is flexible in that it gives the
user control over its effects. There are three adjustments which can be applied
when using this mask, Amount, Radius, and Threshold. “Amount” controls how much or how little to
increase the contrast of pixel edges.
Increase this slider too much and you will get halos around the edges.
Increase too little and you will get practically no effect. For high resolution images experts indicate
that you can push this slider to somewhere in the neighborhood of 150% all the
way up to 300%. (Fig. 1-2)
It’s all about your
taste. Remember you can tone it down
with the opacity slider.
“Threshold” determines how different, surrounding pixels are, before
considering them for sharpening. The
greater the value, the less the sharpening effect. I have mine set at 1 but have used a higher
value like 2 or 3. Some experts recommend
3 or 4.
SMART SHARPEN: This is
the Cadillac of the sharpening filters because it gives the user control over
sharpening and the sharpening algorithm.
It also allows for controls of sharpening over shadows and/or
highlights. It’s not perfect yet but
Adobe is getting there.
 The Smart Sharpen
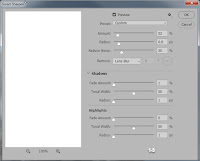
dialog window gives two modes of operation. “Basic” and “Advanced”. (Fig. 1-3) The “Advanced” mode is where you can tweak
the shadows and highlights. There are
three tabs in the “Advanced” mode, Sharpen, Shadow and Highlight. This lets you control how the shadows and
highlights areas are dealt with. The “Amount”
and “Radius” sliders work in the same way as they do in the Unsharp Mask. However there are two additional sliders “Reduce
Noise”, and “Remove”.
Reduce Noise is self-explanatory
but remember reducing noise will soften an image.
The remove option allows you to specify the
sharpening algorithm. For still images
the choice is between “Gaussian Blur” and “Lens Blur”. For moving subjects the option is “Motion
Blur”. There are those that believe that “Lens Bur” has the edge in quality
when shooting stills.
The “Shadows” slider consists of Fade, Tonal Width, and
Radius. The “Fade” slider controls the
amount of sharpening in the shadow areas.
Sliding to the right adds more sharpening while sliding to the left adds
less. The “Tonal” slider controls the
range of tones in the shadows that will be sharpened. They work together with both sliding in the
same direction to increase or decrease sharpness. The “Radius” slider controls the pixels
around the shadows but a lot of pros see that it has little effect and
recommend just leaving it alone.
The “Highlights” controls are the same as the “Shadows” but
targeted to the highlights. The Smart
Sharpen Filter is a RAM hog on a 32 bit system and works best on a 64 bit
system.
IMPORTANT: The most
important thing to know is that, since you are sharpening on a pixel basis,
different sizes of any given image require different amounts of sharpening –
which is fairly obvious, but often overlooked.
So set Photoshop to display an image at “Print Size” when applying
sharpening.
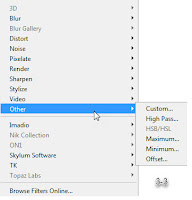
 HIGH PASS: This is
not included in Photoshop’s sharpening menu. It is found in a sub-menu in the “Other”
section under the “Filter” menu. (Fig. 3-3) In
order to use this menu you have to create a duplicate of the background image.
(Menu>Layer>Duplicate Layer) and apply the filter to the duplicate layer,
with the blending mode set to “Overlay” or “Soft Light”. However, Soft Light results in less
pronounced sharpening. The only control slider is the radius slider. The larger the number the more the
sharpening. Using this filter is about
the same as using the “Unsharp Mask” filter but with less hassle because you
have to create a separate layer. Since
sharpening is your last step you could combine all the layers into a combined
layer and then apply the sharpening. Hold
down Ctrl, Alt, Shift, and E to create a new layer that combines all the layers
underneath it. Keep in mind this will
apply sharpening to all your adjustments as well.
Rule-of-Thumb, I like to apply sharpening to various parts
of my image and not the whole image. To do this I will add a “Black Layer Mask”
(Menu>Layer>Layer Mask>Hide All) to my combined layer (Ctrl/Alt/Shift/E)
and using a brush set to white will paint sharpening to the areas I want. I always start with a low capacity (selected
from the brush tool bar) and make several passes. I set flow to 100% and
smoothing to anywhere from 0 to 100%.
Smoothing prevents the jitters from painting with the brush while using
a mouse. I have found that this works great with sharpening wildlife images.
Well that’s it. I
hope this helps and if you have your own method for sharpening please share
with the group.


Excellent info. I use unsharp mask the most. SilkyPix has a deconvolution sharpening that works well with soft images caused by lens diffraction.
ReplyDeleteNice article but I have some questions on using the SmartSharp.
ReplyDelete